Monday, April 30, 2012

10 Website where you can Download Free Vector Logos


Designers always need a high resolution logos. It is difficult and time consuming for a designer to recreate a low resolution logo into a high resolution or vector  and layered files in  order them to use in the printed materials and others. There are times that you can download a high resolution logos but still an image and cannot be manipulate easily. Many websites provide a free vector and layered logo and ready to use for a publication, printed material, website development and others. Here are the list of 10 websites where you can download a free vector and layered logos.

10 Website where you can Download Free Vector Logo


10 Website where you can Download Free Vector Logo


10 Website where you can Download Free Vector Logo


10 Website where you can Download Free Vector Logo


10 Website where you can Download Free Vector Logo


10 Website where you can Download Free Vector Logo


10 Website where you can Download Free Vector Logo


10 Website where you can Download Free Vector Logo


10 Website where you can Download Free Vector Logo


10 Website where you can Download Free Vector Logo

Sunday, April 29, 2012

Show Hidden files and Folders


Show Hidden files and Folders

There are some computer virus and malwares that affects the visibility of your files and folders in your windows explorer, they make some of your file and folders hidden. If you encounter these  kind of problem that you cannot see your specific files and folders don't worry they are not being deleted they are only hidden and you can still see them. Also some of the critical system files of your operating system are also hidden in defaults, like your email messages and contacts, or the data files of Microsoft Outlook, Outlook Express and some other email clients and also other applications.
How to show your hidden folders and files:

·         Go to My Computer
·         Select the Drive or the folder where your files are being saved
·         Click on Tools menu of your Windows Eplorer
·         Select Folder Optiions. Make sure that you click the selected folder that where your files are being saved
Show Hidden files and Folders

·         Goto View Tab
·         Under Files and Folder Options look for Hidden files and Folders
·         Select the option Show hidden files, Folders and Drive
Show Hidden files and Folders

·         Then Click OK to save and apply the new settings

Saturday, April 28, 2012

Show your Windows XP Quick Launch Toolbar

Show your Windows XP Quick Launch Toolbar


Quick launch toolbar is a shortcut that can be seen beside the start button. It is used for the easy access links and shortcuts of applications, drive and other files within your computer and other computers with-in a locan area conection. Steps below shows how to show quick launch toolbar for Windows XP.

1.    On Windows XP  Computer, right click on the task bar that can be find at the bottom of the screen
2.    Select toolbars option in the menu
3.    Click Quick launch
Show your Windows XP Quick Launch Toolbar

You can now add new shortcuts in your quick launch toolbar by simply dragging the application shortcuts of dive shortcuts in the quick lauch shortcu toolbar.

Friday, April 27, 2012

Measuring your internet connection speed


Every one of us wants a faster internet connection when browsing online, downloading and uploading pictures, videos, music and other stuff. Gamers also want fast internet connection speed when playing games online. Internet speed is important in an online user, so the question was, did you get the correct amount of internet speed based on what you paid? Many users did not aware that they did not utilize the internet speed based on what they paid monthly. If you are one of them better check your internet service provider or your monthly billing statement for the speed you paid and check from time to time your internet connection speed.

Here are some of the websites where you can check your internet connection speed.

Speedtest
http://speedtest.net
Measuring your internet connection speed


Bandwith Place
http://www.bandwidthplace.com
Measuring your internet connection speed


Broadband Speed Checker
Measuring your internet connection speed

Wednesday, April 25, 2012

Removing Start-up Applications Can Improve your Computer Speed


Removing Start-up Applications Can Improve your Computer Speed
There are many components that affect the speed of your computer in loading its operations system. One of this is the start-up applications or applications that are configured during  installation and automatically runs everytime you start your machine.  Some other application, allows you to set this options and ask you if you want to add it in your start-up, some others are set in default. 
Some users  manually added some applications on start-up without knowing that it can affect in the speed of loading of their operating system. Some of these applications are anti-virus, instant messenger’s applications, e-mail applications and internet browsers.
Here's how to remove or disable these start-up applications.
1. Click Start 
Removing Start-up Applications Can Improve your Computer Speed

· Run
· Type msconfig for Windows XP User

Removing Start-up Applications Can Improve your Computer Speed

· For Windows Vista and Windows 7  click  Start
On the Search Programs and Files
Type msconfig
2. You will be now redirected to System configuration Window settings
3. Navigate to Start-up menu
Removing Start-up Applications Can Improve your Computer Speed

4. Uncheck the checkbox of all the undesired and unnecessary applications you want to load during operating system start-up.
5. Click apply, and click OK
6. Restart your computer to apply changes in settings.

Tuesday, April 24, 2012

How to change your yahoo messenger skins


How to change your yahoo messenger skins
Yahoo Messenger 10 and new released yahoo messenger versions allows you to customize your Yahoo Messenger Application skins.
To change your yahoo messenger skin
  • Open your Yahoo Messenger Application and Log-in your account
  • Click the skins icon on the top of your Yahoo Messenger, its a circle icon before minimize and maximize
How to change your yahoo messenger skins

  • In the drop down options, Click the skins you want to apply and it will automatically applied to your yahoo messenger application


Adding your Email Account in Microsoft Outlook


Based on my personal experience Microsoft Outlook is one of the best email client application that I ever used because of its complete menus and its inbox folder does not easily crashes when you have receive a lot of email. This is usually some of the problems encountered by an email client’s software user. Inbox is one of the most important folders in an email. I've been using Microsoft Outlook for at least five years and satisfied with it.
Adding your email address in Microsoft Outlook is so easy. It was almost similar with other email client’s software. You can add several emails in Microsoft Outlook if you like. To add your email in Microsoft Outlook follow the instructions below;

If you open your Microsoft Outlook application for a first time a small window will pop-up that you need to add an email, if not don’t worry we will open it manually.
1. Open your Microsoft Outlook Application.
       • If you have no shortcut in your start menu, go to the Microsoft Office Folder by clicking on your stat  menu > all Programs> Microsoft Office> Microsoft Outlook
2. In your Microsoft Outlook top menu
       • Click on tools
       • Select account settings

3. Navigate in email tab
4. Click NEW button
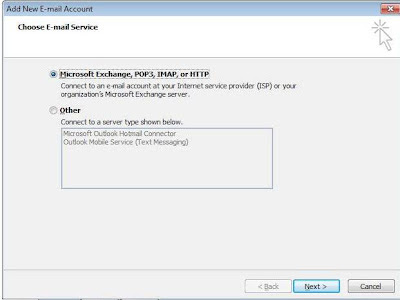
5. Select Microsoft Exchange, POP3, IMAP or HTTP, it is the most common settings that email address supported, but make sure that your email address supported this, if you are not sure call your hosting provider
       • Click Next

6. Check the checkbox “Manually configure settings or additional server type” at the bottom part. Then click NEXT.
7. Select “Internet Email” in the choose email service options. Click NEXT.
8. Enter your name, the name you want your recipient want to see when you send an emails.
       • Example “ Juan dela Cruz”

9. Enter the email address in the email address text box “ email@domainname.com “
10. Enter the password of your email.
11. Select POP3in the account Type under the system Information. Most of the mails can support POP3, but make sure that your email address can also support this option.
12. Enter your incoming mail server and outgoing mail server. Ask your email service provider for it.
       • For Gmail the incoming mail server was pop.gmail.com

       • And outgoing mail server is smtp.gmail.com
13. Under Account Information, enter the following
       • User Name: email@domainame.com, include the domainname.com or else it will never work
       • Enter the password

14. Click the “More Settings” Button
15. Navigate on Outgoing Server Tab
       • Check the checkbox “ My Outgoing server (SMTP) needs authentication
       • Select Log-on using. Enter your email address and password
16. Now navigate to Advance tab
17. Under the port numbers
       • Enter the Incoming server POP3 port number. If you did not know call your hosting provider.
       • Enter the outgoing (SMTP) port number. If you did not know call your hosting provider
       • Click OK
18. Click NEXT
19. Click Finish

You can now send and receive email. Check if it works by sending a test email message to your own email address.


Monday, April 23, 2012

Making Microsoft Outlook as you Default Email Recipient


Making Microsoft Outlook as you Default Email Recipient
 These steps will allow you to make your Microsoft Outlook Mail Client Software as your default mail recipient or the one who will receive and send messages automatically. You will notice that once you click any links with an email address included like in email messages, website or other documents, email software will automatically open, this application is your default email recipient application.

• Open your Internet Explorer Application. Steps may vary depending on the version of your Internet Explorer. This step was made with Internet Explorer 8.

• Click on Tools Menu.  If your Internet Explorer menu did not show Press ALT key in your keyboard.

• Navigate to “Programs”

• Under Internet Programs Click Set programs Button

• Select Set Program access and computer defaults Under the Choose Program that windows Uses by default Selection.

• Collapse the options Under the Custom

• Under the Choose the Default E-mail Program, select the Application the your Computer uses as an default e-mail Client (for example windows live Mail)

• Click Ok when Finished.

Restart your computer to apply settings.

Sunday, April 22, 2012

Changing your Google Chrome default Language


Google chrome default language depends on your country settings when you downloaded and installed Google Chrome Application. For example I am in the Philippines and my computer was set on Philippines as a default country automatically the default language settings of my Google Chrome Application is Filipino which many users didn't want.


Follow these steps to change your Google Chrome default Language;

1. Open your Google Chrome application
2. Click the settings Button, it can be found on the Upper Left corner of your Google Chrome Browser.
3. Select Settings.


4. There are three options that you can choose Basic, Personal Stuff and Under the Hood.
5. Select Under the Hood.

6. Look for Web Content, select Language and Spell Checker Settings.
7. On the Language and Input Window you can now see what Language Added on your browser and what your Google Chrome default Language was.
8. You can add Language by Clicking the Add Button Below and remove undesireds Language.

9. To Add Language click the Add Button and select the Language on the Drop down Menu and Click OK.
10. You can set your default Google Chrome Browser Language by Selecting the Language that you desire.

Close the settings windows when finished. New settings will automatically applied after you restarted your Google Chrome Application.

Saturday, April 21, 2012

Installing Chinese Language or East Asian Language in Windows XP


Installing Chinese Language or East Asian Language in Windows XP
Having problem in viewing a website probably based in China? Or you cannot read your emails from your contacts whom using a Chinese character in sending a message? Here are some of the problems encountered by a user which their computer being used was not installed by a languages form China and Japan or East Asian Language in common terms. These problems usually encountered in a computer which running in Windows XP Home Edition. Default Windows XP installation did not includes the installation of East Asian Language although the components are being included in a Windows XP Installation CD.
If your computers are not being installed by these East Asian Language you cannot see any letters or text when you browse or view any websites or emails from China whom uses a Chinese characters. You can manually install an East Asian Language by using your Windows XP Installation CD. Just follow the steps below on how to install East Asian Language Options in Windows XP.

1. Insert the Windows XP Service Pack 2 Installation disc into your CD drive. If a window titled "Welcome to Microsoft Windows XP" opens, Close it by clicking the "Exit" button.

2. Navigate to the Control Panel by clicking the Start Button, then clicking "Control Panel."
If you are using Classic View, you should click the Start Button, then "Settings," then "Control Panel."
Installing Chinese Language or East Asian Language in Windows XP

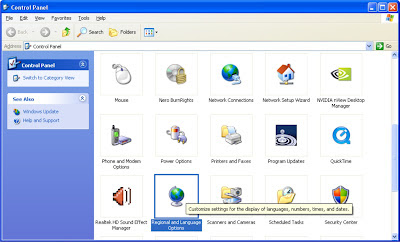
3. Click on "Date, Time, Language, and Regional Options," then click on "Regional and Language Options."
If you are using classic view, "Regional and Language Options" will be available directly from the Control Panel. A new window will open.
Installing Chinese Language or East Asian Language in Windows XP

4. Click on the tab labelled "Languages," then click the checkbox labelled "Install files for East Asian Languages." A confirmation window will pop up to warn you that you will need at least 230 MB of free disk space to install the files.
5. Click OK to close the popup window.
6. Click OK on the “Regional and Language Options” window to begin the installation. Be patient, as it can take several minutes.
Once all the files have finished copying, a popup window will tell you to reboot your computer to complete the installation.
7. Before you reboot, remove the Windows XP Installation CD from your CD drive.
8. Reboot your computer to apply new settings
9. Check any website or emails that having a Chinese character if your settings was applied.

Friday, April 20, 2012

Back-up and Restore your Computer’s Registry


Registry is one of the most crucial parts of your computer’s data. In registry editor you can find some most of your computers database files including the system files and Windows Operating system files. It is necessary to back-up your computers registry before making changes on it so that you can restore if there is a problem or errors occurred in the modification you made.


Back-up your computer registry files.


1.Click on Start Menu.
2.Select Run.
3.Type “regedit” with-out quotes.
4.In Registry Editor Window,
         •Click on “File” then “Export” to export the registry data.
         • Export registry entry as .reg file type.
5.Exported registry file will appear in file name like this “registrybackup.reg”.
6.Click Save

Restoring your Computer’s Registry Files.
1.Click On Start Navigate to Run
2.Type ”regedit” to access registry editor.
3.Go to File Menu
4.Select Import
5.Browse the registry entry back-up
6.Click Open
7.Restart your computer to save settings

Thursday, April 19, 2012

Changing your Windows Computer Taskbar Location


Changing your Windows Computer Taskbar Location
Taskbar is a menu bar where you can see your running or opened application at a time. You can see and navigate quickly on your opened application using this. This is also a quick menu where you can see your most used applications and programs that can be customized depending on the user’s choice but it was only applicable for Windows 7.

Computers running in Windows Operating system has a default taskbar position in the lower part of your computer screen, but you can customize it depends on your choice. It can also be place in the top, left side and right side of your computer screen.  To do so,

1. Right click on your taskbar (found at the bottom of your computer screen)
Changing your Windows Computer Taskbar Location

2. Choose Properties

3. On taskbar and menu properties,  choose to taskbar tab at the top menu

4. Select the location you want on where to place the task bar by clicking the drop down menu on “Taskbar location on screen”
Changing your Windows Computer Taskbar Location

5. Click Apply and Click Ok

Wednesday, April 18, 2012

Sending Large File Attachment That cannot be send in email via Yousendit


Yousendit  it is one of the most popular secure file sharing website nowadays. Yousendit allows you to send 100MB file size for a free account. It you want a higher capacity up to 2GB, you will register to a premium account which has a monthly payment

Sending Large File Attachment That cannot be send in email via Yousendit


Yousendit offers a user friendly application suitable for all users online. You can send different file in Yousendit  such as Microsoft Office documents like Microsoft Word, Excel, PowerPoint, etc, and you can send also pictures and videos in you send it. You can set also security of the files you send by setting up a password to it.

Yousendit sends messages to the e-mail address of your recipient containing the link of the file and the password and also send messages to the sender if the file has already sent to the recipient.

Sending Large File Attachment That cannot be send in email via Yousendit


How to register a Free account;

1.Visit you send it website at www.yousendit.com 
2.Create a free account on Sign up.
3.Select Free Single user 
4.Complete the information on necessary sign-up field
5.Open the e-mail you provided and click the verification link to complete registration.


How to send a File via You Send It;
1.Log in your account
2.Go to send a file
3.Enter your e-mail address “From” Textbox ( for sender)
4.Enter the recipient e-mail address in ‘To” textbox. You can add recipient e-mail address by adding semi-colon after the e-mail address.
5.Attach the file in the file attachment. Please take note that 1 file per upload. I suggest you to compress your files into zip or rar  file  using file compression software like winrar or winzip if you want to send more than 1 file.
6.Enter the subject  and the message but it is only optional.
7.You can also verify the recipient identity by checking the textbox in “Verify Recipient Identity’, but it is also optional.
8.You can view the file you want to send by clicking  “Preview what your recipient will see button”
9.And Click “ Send It” if finished


Receiving and Downloading a File in Yousendit
1.Wait for the e-mail from that containing the link and other information included from the sender.
2.If you already receive the e-mail, click the link, you will be redirected to the files link.
3.Click Download file:

Downloading a file does not need an account.


Tuesday, April 17, 2012

How to Show Google Chrome Bookmarks Bar


How to Show Google Chrome Bookmarks Bar
Browsing your favourite website will be easy using bookmarks. Bookmarking is a tool for an internet browser to save a link of your chosen website, blog, or other internet link into your internet browser like Google Chrome, Mozilla Firefox, Safari, Internet Explorer and others.  In Google Chrome there is a tool or menu called Bookmarks bar where your Bookmarks displays in the top of your Internet Browser, along with the other menu.
Default Google Chrome installation did not show the bookmark menu.  To manually show the Google Chrome bookmarks menu follow the steps below;

1. Open Google Chrome browser

2.   Click on the Settings. Settings icon can be found in the upper right corner of your browser, just below close button.

How to Show Google Chrome Bookmarks Bar

3.  Go to TOOLS, click the option “ Always show bookmarks bar”

For the keyboard shortcut press Cntrl+shift+B on your keyboard to automatically show the Google Chrome Bookmarks bar.

Sending Large File Using Sendpace


Sending Large File Using Sendpace

Sendpsace is one of the most reliable websites on sending and receiving large files online. In Sendspace you do not need to create an account to send files. Just Attach the File, Enter the email address where you want to send and your email address as a sender the upload, just easy as that.


Browse the file you want attach and send.

Sending Large File Using Sendpace

Enter the email address where you want to send the file. You can add multiple email address. Enter also your email address in the texbox labeled from.

Sending Large File Using Sendpace

Try sending message on Sendspace now!
Related Posts Plugin for WordPress, Blogger...

Topic of the Week


Followers

Directories

Computers Blog Directory Top  blogs Blog Directory & Search engine Top Technology-Internet Sites
Copyright © 2013 Charotero - A Personal Technical Diary | Powered by Blogger
Powered by Edgy Facts - Widget